
My girl, Joy, came up with an amazing project last week that really got my wheels turning. You know when you see something and it inspires you to want to do 25 other things with the idea? Yep, it was like that. Hop on over to see her Recycled T-Shirt Scarf and you'll know where I'm going with this.
See, Joy and I have a similar problem. All our shirts grow holes near the bottom, in the tummy area. We've come up with many ideas as to why this happens (leaning against the counter to wash dishes might be the culprit). What in the world do you do with these shirts with all the tiny holes? Well, you can turn them into a scarf like she did, or you can just cut out the offending parts and layer it!
Recycled Layered T-Shirt
Supplies:
2 t-shirts
paper
chalk
scissors
needle
thread
Begin with two t-shirts, I chose the outer shirt one size larger.
Supplies:
2 t-shirts
paper
chalk
scissors
needle
thread
Begin with two t-shirts, I chose the outer shirt one size larger.

Free hand a leafy sort of design (or hearts, or stars, or smiley faces...) on a sheet of computer paper. Cut out the design like this:

Lay your stencil onto the outer t-shirt and rub the chalk over the open spaces - Yes, I stole this sidewalk chalk from my poor children.

See the design left behind? Actually, looking at this gives me an idea for another project...hmmmm, filing that away for another Tuesday...

Cut out the design with your scissors (*tip: it's easier to do this by cutting a snip out of the center of the leaf first, then work your way out to the edges.)

Okay, this is where brilliance comes in! Oh, that Joy is so amazingly brilliant! Using a q-tip, dab bleach along the edges of the cut out leaves. (Line the shirt with a newspaper to protect the back first)

You end up with these aged-looking edges that make my heart sing!!! (La, la, la!) Now, quit singing and rinse her off and dry her a bit before moving on to the next step.

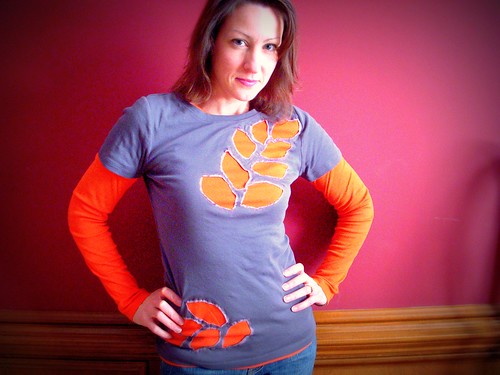
Layer the two shirts together and sew the leaves around the edges. Joy did this by hand with embroidery thread, but I'm a little impatient, and whipped out the machine instead. Some contrasting hot pink thread with the gray and orange was just the ticket!

Now, stand around a take pictures of yourself in your cute new Layered T!

Imagine the color combos! The designs! The possibilities!

Now, head on over to Kimba's to see lots of other great ideas for DIY day:

Don't forget to enter my Blogiversary Giveaway!


OOOh, You and I Do think alike...trying to save all of those shirts with holes in them!
ReplyDeleteSuper cute! I love it!
ReplyDeleteoh how I love this! fabulous!
ReplyDeleteVery cool! I love it! I have the same problem with my shirt and thought the same thing. No more dishes!
ReplyDeleteGreat idea...this is super cute!
ReplyDeleteThat is fabulous! :)
ReplyDeleteWhat an awesome idea! I love those colors together.
ReplyDeleteBrilliant idea! Love the leaf design too...very cute :)
ReplyDeleteThis is VERY cool. Love the layered look, thanks for sharing!
ReplyDeleteAlrighty then........gotta dig in my closet and find some cute tshirts to play with!!!!
ReplyDeleteI LOVE that!! Bookmarking this to do on a lazy weekend. :)
ReplyDeleteSupah cute! A great way to get a unique, stylish t-shirt. Fun colors too.
ReplyDeleteThat is just way too cute!!
ReplyDeleteLove it! SUper cute! Except I am not sure I can free hand anything...
ReplyDeleteI love it...when I get home this weekend I am doing some diggin' in the closet.
ReplyDeleteSuper cute...I would totally wear this. That's it..I MUST learn to sew. Oh and a sewing machine would probably help too!
ReplyDeleteYou have that too! I mean the holes in the tummy area. I have ruined some fabulous shirts that way and right on top of your navel is not a good place to put a patch. But your idea might work. Gonna take a second look at my pile of throw-away shirts if I can rescue any of them.
ReplyDeleteThanks so much!
This is one of those tutorials that make you say "WOW"! LOVE this!
ReplyDeleteFabulous! I love it - what a perfect way to revamp old clothing! Thanks for the inspiration!
ReplyDeletethat is fudging awesome!
ReplyDeleteVery cool, Jennifer!! Love your tutorials. I will post about the shirt a made a couple of weeks ago from your site. xoxo! Lisa
ReplyDeleteSuch a smart idea! I blame my belt for putting holes in my shirts at the belly - I like the washing dishes better, makes me sound important!
ReplyDeleteI get those holes too but I don’t own a belt!? So I thought it was from the top of jeans, the square corner. I only wear jeans or any pants maybe 4 or 5 times a year though.
DeleteSo cute ~ saw the scarf on Joy Beadworks site last week and now this! Love it!
ReplyDeleteCompletely and totally AWESOME!!! The bleach idea made it a hit!!
ReplyDeleteI LOVE IT! Another one I will try. Maybe when my mom is in town this weekend! You're so creative, Miss Juniper... exactly why I heart you so much! :)
ReplyDeletePerfect! I have a love/hate relationship with chlorox clean up...many a shirt has been lost by a careless reach!
ReplyDeletewhat a wonderful idea! so cute
ReplyDeleteI'm definitely trying this one out! Love it!!
ReplyDelete-xoxo
E
This is so cute. And I have TONS of t-shirts with holes in the tummy area. I think the holes come from fat shooting into our tummies from the foods around us, personal belief though:)
ReplyDeleteLove these!!! I'm going to make one tonight.
ReplyDeleteI had to skip the tutorial just to comment, then I'll go back and read the tutorial. OMG! You are SO right with the holes! What the heck? My theory is that it's from belts because it also happens with my 16 year old and she sure as heck doesn't wash dishes. Ok, now for the tutorial. :)
ReplyDeleteOh, this is EXCELLENT! I don't get holes in my shirts. Instead, all of my favorite shirts end up with permanent stains...those greasy ones you don't see until you run them through the dryer and heat set them for all time. I cannot wait to give them this treatment!
ReplyDeleteIf only I sewed!!!!
ReplyDeleteSo super cute!! My teens would love this..
ReplyDeleteBTW I made the scrunchy scarf It was so cute. But then I took your original idea made 3 different variations from the original pattern.. It was so much fun!
Thank you so much for inspiring me!!
Genius!Can't wait to try this!
ReplyDeleteCute idea! When I spotted what looks like the Post Gazette, I was excited. I lived in Pittsburgh until last summer.
ReplyDeleteGreat idea! I can't even tell you how many T-shirts my Hubby has with holes...he's a chemist...so he gets acid on them. I'll have to think about if there's a design I could get him to wear.
ReplyDeleteThis is just so cool! I may try it one day!
ReplyDeleteWhat a creative idea! So cute.
ReplyDeleteLOVE LOVE LOVE IT!! I know what my housework avoidance project for tomorrow is :) But I am wondering if I could get away with just putting some contrasting stitches on the top layer instead of sewing them together...that way I could use the same undershirt and switch out the top one? Lord knows I have enough short sleeve shirts that have been ruined!! Thanks soo much for the inspiration.
ReplyDeleteVery cute!!
ReplyDeleteOmg! I love this! So super-cute!
ReplyDeleteLove this! It looks great!
ReplyDeleteYOu have just saved me a thousand heartaches!
ReplyDeleteMy daughter has a ton of Tee shirts that have stains on the front of them. I can actually see me layering them with a funky design cut from where the stains "used to be". She's going to be the coolest looking 5th grader! You rock!
I LOVE this! wow, job well done! :)
ReplyDeleteWhat an awesome idea. It looks great.
ReplyDeleteFantastic idea!
ReplyDeleteOk- I hit the clearance racks at Old Navy today and I'm ready to make two shirts like these. I'll link your blog to my post when I am done. Thanks so much for the awesome tutorial.
ReplyDeleteBeautiful!
ReplyDeleteYou can also sew your pattern first and then cut out the shapes. I find this easier in order to keep the fabric straight. Also, if you don't have another whole shirt to use for underneath you can just cut out a piece of fabric to go under your cut-outs. I did something similar with one of my daughter's shirts using the sleeve from a different shirt to go underneath.
Tried the tee today and it turned out so cute. I didn't layer long sleeves under short, just cut up an old tee for the backing.
ReplyDeleteHow creative and stylish! I love your leaves design. My niece is a big fan of layered tees. I'm going to make one for her. Thanks so much for the tutorial! I've done cool craft projects and posted on www.makemania.com Take a look at mine and feel free to promote awesome projects fm your blog!
ReplyDeleteI LOVE this idea!! While I don't have problems with holey tees, I DO have tees that I love that I have had to retire because of a random stain. This is a PERFECT way to upcycle those shirts! The only difference I will be doing is NOT sewing the shirts together...that way I can enjoy the outer shirt with many different color pairings.
ReplyDeleteThis is adorable and so exciting with so many designs and color combinations, how do I choose?? LOL!!! Definitley going to try this. Granddaughters will love them! Thank you.
ReplyDelete~Louise-Slave To My Needles
I love this idea! Although, you forgot to mention all the stains you get from grubby little (adorable) kid hands ;-).
ReplyDeleteBrittany aka Pretty Handy Girl
How cute is this!
ReplyDeleteYou are such clever girl!
I'm gonna try this for sure!
A beautiful idea and a great tutorial. Thank you so much!
ReplyDeleteI just found this on pinterest and LOVE it! Thanks for the easy to follow directions?
ReplyDeleteThis is so cool. I would like to feature it on my sewing blog here:
ReplyDeletehttp://sewprettysewfree.blogspot.com/
Can I use one of your pictures?
I thought I was the only one who got those little holes around the belly. For the longest time I thought it was from my cat who liked to sleep on my lap/kneed my belly. I don't tend to do a lot of dishes or wear belts. I'm thinking now that maybe it is from the pointy corner by the top button/snap of my jeans.
ReplyDeleteThanks for the great idea!
I'm thrilled to find this post with instructions! I was at a craft fair yesterday and saw a booth with this type of t shirt. The designs were amazing but what I really want is my company logo so will have to do it myself. Glad you said your friend sewed hers by hand because I don't own a machine. Yay! Thank You so much!
ReplyDelete..This is a wonderful idea.. (my english in not wonderful) . one day I'll copy it....today I pin it!!
ReplyDeleteI saw this tutorial ages ago and have always loved it. But only now did I finally get around to doing it! Thanks so much for the fantastic idea! http://www.cucicucicoo.com/2014/05/layered-reverse-applique-t-shirts-covering-stains/
ReplyDelete:) Lisa
If you want your shirts to stay in good condition, there are a few things you can do. First, always launder them according to the care label. Second, don't use too much detergent. Third, don't use bleach. fourth, don't wash them too often. Finally, don't put them in the dryer.
ReplyDeleteI've always wondered if undershirts were worth it, and your post has convinced me they are. Can't wait to try out these secrets and enjoy a cooler, more comfortable day!
ReplyDelete