Do you remember this post about my messy purse? Well, I decided to do something about it and came up with a tutorial to make your own organizer.
The added benefit to organizing your "necessities" (aka "junk") is that it makes the transition to another purse in your collection easier if you're running out the door. Really, how many times have to gotten to the check out in Target only to realize your wallet is in your other purse? I like to think of this as my public service (ha!)
Okay, lets gather your suppies:
1/2 yard medium weight fabric
1/2 yard medium weight interfacing
sewing machine
scissors
yard stick

Pin your three layers together with the fabric's right sides together and the interfacing on top.

Sew this rectangle together, leaving a space of about 3 inches unsewn. Do you see the space between the zipper foot and the arrow? You will need this opening to turn your sleeve of fabric right side out.

Reach into the opening and grab the other end of the rectangle and pull the sleeve right side out.

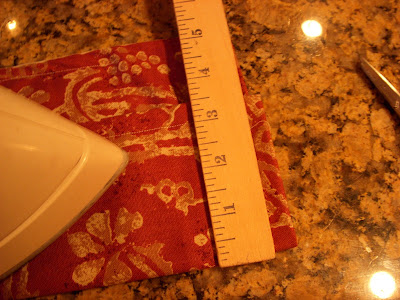
Now you will need to press the rectangle of fabric (**side note: this iron shown came into the relationship with my husband...we've been together almost 13 years!)

Now, fold in the edges of the opening and press. Topstitch it closed and continue stitching around all of the edges.

Fold the bottom edge up about 3 1/2 inches and press again.
I made my organizer from scrap fabric I had around the house, but we made these at our last girl's coffee and I was able to make 4 organizers out of 1 yard of fabric and one yard of interfacing. So, working out to about $2 apiece, it's an affordable surprise.


Whoa, that is too cool - and easy too! I'll have to make one. AND we have the same cell phone!
ReplyDeleteSigh...yet another reason why I need to learn how to sew!
ReplyDeleteI would especially love this in my diaper bag so I could organizer all of my toddler's odds and ends!
Very clever. You should see what type of reaction you get in your shop. I bet people would buy these.
ReplyDeleteTammy
what a great design!
ReplyDeleteThat is really fabulous! Thanks so much for sharing, I'll be linking.
ReplyDeleteThanks again Miss!!! I LOVE mine!!!!!!.......and after I tunnel my way into my craft room....I'll be making more!!
ReplyDeleteThought I'd leave some love from Katy, Texas! So making this for the females in the family for Christmas! Thanks!
ReplyDeleteGreat idea! This might make an awesome Christmas gift. Easy and a good thing to have!
ReplyDeleteMade it! Love it! Too bad it is for a friend!!!!
ReplyDeleteThanks for the excellent instructions.
M. Smith
OK, I'm not getting something here...how big were those original 3 pieces that got pinned together?
ReplyDeleteThe word I think you are attempting to spell follow 'Chef' in your title/description is spelled: chauffeur
ReplyDeleteAwesome!!! Thank you!
ReplyDeleteI have the same question as Donna.
ReplyDeleteLove this tutorial! Making one.
ReplyDeleteJoAnn
sweetpepperrose.blogspot.com
Such a GREAT idea and sooo simple! I've seen other purse organizers, but very complicated to construct and bulky as well. Thanks for sharing!
ReplyDeleteThis is such an excellent idea! i really like the thought of getting compartments in your purse and was considering shopping for one thing just like the bag only for the organization facet thus thanks for this alternative!"Nicely given data during this post, I opt to browse this sort of stuff."The handbag organizer appearance nice, one thing I undoubtedly would like for my mess of a bag! assume i am attending to go get myself one currently thus give thanks you!I just stumbled upon your blog and wanted to say that I have really enjoyed reading your blog posts. Any way I'll be subscribing to your feed and I hope you post again soon.A fantastic presentation. Very open and informative.You have beautifully presented your thought in this blog post.
ReplyDelete